5 Ways to Improve Your E-Commerce SEO Without Building a Single Link
If you’re looking for a few quick wins in e-commerce SEO, here are five improvements you can make right now – no link building required!
Read the full article here: https://www.searchenginejournal.com/improve-ecommerce-seo-no-link-building/210134/
What Makes A WordPress Website Secure?
One of the biggest concerns I hear from clients when it comes to having a website built on the WordPress platform is in regards to the security and whether or not their website and their users will be vulnerable. WordPress is one of the most widely used open source content management systems in web design, so this of course makes it a very big target, however by taking appropriate preventative security and hardening precautions, there’s no reason that a WordPress website could not be considerably hardened against attacks.
1. Update WordPress Core & Plugins
One of the easiest and most effective things that you can do to improve the security of your website is to stay up to date with WordPress core updates, WordPress plugin upgrades, and any updates you may be receiving for themes or dependencies. One of the great things about the WordPress community is the vast number of brilliant developers who are constantly investigating and improving the underlying code behind WordPress. The collective knowledge going in to these updates are typically aimed at patching bugs or vulnerabilities within the system, so by utilizing each update, you are ensuring you have the most up to date, hardened WordPress system.
2. Use Secure Passwords
By default, the method of encryption that WordPress uses for password hashing is not considered to be the “most secure”, in fact MD-5 hashing has been found to suffer from extensive vulnerabilities. This being said, it is all the more important that your password be one that is very unique and extremely difficult to guess. Some of the basic rules to follow are to use a variety of uppercase and lowercase letters, numbers and symbols in your password, for example PaSsworD99##. However, I typically also suggest that you go a step further and swap out certain letters for number replacements, for example P4Ssw0rD99##, where the “A” has been replaced by a “4” and the “o” has been replaced by a “0”. By breaking up whole words with numbers, you are making it considerably more difficult for a hacker to access your website using a brute force or dictionary guessing attack.
3. Do Not Use the Default “Admin” Username
Many times, hackers are not attempting to hack websites one by one, but instead are using scripts to scan multiple websites simultaneously for vulnerabilities or to launch attacks. For example, a standard brute force login attack is likely just going to be a bot that has found your login page and is now running as many password combinations as it can against a user name before it’s either successful or is locked out. Typically, the first username that will be attempted to login to will be “admin” as it’s one of the most commonly used admin usernames. By using a less common username, you are making it even more difficult for a hacker to “guess” his way on to your website.
4. Make Sure That No Sensitive Files Are Exposed
There are a number of files within your WordPress file system that provide information about WordPress version, any plugins that may be running, themes being used, database credentials and more. Often times access to these files alone will not allow someone to access your website, however the information gathered would be the starting point in finding a vulnerability and exploiting it.
5. Lock Down Your Web Server
Often times the main goal for a hacker is to get access to your web server so that they can either publish pages with malicious content or backlinks to other sites, or so that they can “hijack” your server to be used in a larger Botnet, or in a sense, as a single ‘worker’ amongst a large group of ‘workers’. Since your WordPress website is connected directly to your web server as well as your database, it presents an attractive way to gain direct access to the server. One very basic thing you do to seriously mitigate these risks is to deny access to every IP address with the exception of a few “whitelisted” IPs. These IPs would ideally belong to you, any necessary employees, and your developers, this way anyone who is not connecting from one of these IPs will not be able to access the server, regardless of whether they have the correct credentials or not. While no method is 100% foolproof, this methodology would make it so difficult for someone to exploit your server that it would likely not even be worth the attempt.
When seeking out a new web design and content marketing agency to build your WordPress website, user experience and functionality should not be your only concerns. As WordPress continues to grow as a platform, security will continue to be more and more important when it comes to your users experience, your search engine rankings, and your overall success online. If you have a WordPress web design and feel it’s ready for a full website security audit, we’d be happy to run one for you at no cost to you.
Simplified WordPress Custom Post Type Generator
One of the functionalities that makes WordPress a great CMS for website development is the ability to create custom post types. A custom post type allows you to create a customized version of the “post” so that you can group any sort of content you’d like at the “post” level.
For example, let’s say you wanted to group together items like FAQs, portfolio items, or videos. The best way to do this would be to create a custom post type for any one of these groups and then to store each individual item as a post. So a custom post type for FAQ’s would allow you to store as many individual FAQ’s as individual posts underneath it. Then, any time you need to access all of your FAQ’s in a loop, it’s easy to do so.
To simplify the process of creating a new custom post type for a WordPress website, we’ve created an easy to use tool built in simple jQuery. The tool will ask for as little information as possible from you to create the most comprehensive custom post type possible, which you can then edit manually if any further changes are needed.
Once you’ve created your code snippet, simply copy it and paste it in to your functions.php file along with your other custom post types. To be safe, it’s always best to back up your functions.php file before making any changes. Once you’ve modified your functions.php file, you should now be able to see your custom post type within your WordPress CMS dashboard. You can now create a custom template for your new post type post’s by creating a new file, single-POSTTYPE.php. Using our FAQ post type as an example, it would be singe-faq.php.
Take a look at our WordPress custom post type generator and let us know if you have any questions or concerns on how to use it.
Don’t Build A Magento Website Until You’ve Read This
If you are considering launching a Magento website to facilitate all of your e-commerce, there are quite a few things you should know before starting the project to ensure you get the best possible finished result.
Choosing A Designer
So you’ve decided you want to build your e-commerce store on the Magento platform, now it’s time to find someone who can really bring your ideas to life. Start by searching out designers who not only have a considerable amount of experience in layout and UX/UI, but more specifically designers who have UX/UI experience specifically in e-commerce. It is important that this designer fully understand the subtle differences between designing for a branded store, a “marketplace” type store, a store with minimal products and the various other types of potential e-commerce websites there may be. If your goal is to have a store with 10,000 products from various brands and manufacturers, it will need to be designed very differently than a website that is for one specific brand to showcase their product line. By looking through the portfolios of potential designers, you should be able to get a good idea of the e-commerce work they’ve done and how well they can communicate each website’s “core message”. Once you’ve found your design team you will need to contract with a developer.
Finding The Right Magento Developer
While you may be able to find an agency that employs strong designers as well as experienced Magento developers, there is no law that says the person who creates the website designs is the person who must implement the website development. Often times, the best developers won’t be very strong designers and vice-versa, so it is important to do your due diligence. Start by searching out Magento developers with a proven work history or portfolio of creative, functional Magento websites. Check these websites for page speed, bugs, mobile responsiveness and any other issues or problems you may find. Chances are, if a majority of the websites in the developers portfolio are slow to load and don’t work very well, yours will end up the same way. Another great resource for finding and vetting Magento developers is Magento Connect. Many Magento developers will publish themes and extensions to Magento connect, often times for free. You can then verify that they are in fact Magento developers and even try out some of their work to see if it would suit your needs.
Securing The Best Hosting
Once you’ve found the team to build your Magento website, it’s time to secure a hosting provider that works well with Magento. Magento is a very large PHP application, which means it will require more than your average shared hosting server to operate properly. As a web design agency, we have worked with just about every major Magento hosting provider, and at this point our favorite is Nexcess. Nexcess has several very affordable hosting options that come fully optimized for Magento and include some very necessary add-ons, like a CDN for example. Nexcess also has an extremely knowledgable support staff, not only in managing your server, but also in general Magento knowledge and troubleshooting.
Experienced Ongoing Magento Website Management
While you may be able to afford to bring on someone in-house to manage your Magento website, it’s probably best to engage with a professional web agency to manage the technical operations of your Magento website. Aside from simply adding and modifying your products, quite a bit of work goes in to properly managing a Magento store, and often times it can get fairly technical. Finding a team of experienced Magento web developers and designers to manage and maintain your Magento store will ensure it continues to run at peak performance and maintain best possible security.
Bricks & Mortar Creative is a web design agency that focuses on all three areas of Magento – design, development and management. We are not only highly experienced when it comes to user experience for e-commerce website, but have also spent a lot of time working directly with the Magento code base, continuously refining our Magento development skills. Further, we work with brands and companies of all sizes to manage, maintain and grow their Magento websites and e-commerce businesses. No matter how large or small your company or website is, feel free to drop us a line if you’d like to talk with us about any of our Magento services.
2020 Update – Magento End of Life
Another thing to consider when building a website on Magento is the version of Magento you’ll be using. Starting in June 2020, Magento 1 will no longer be supported. This means that things like security patches, platform updates, and even new 3rd party extensions will no longer be released for Magento 1.
While Magento 2 is a very robust platform, it’s not without its quirks. Developing a website for Magento 2 is also considerably different than developing for Magento 1. This means you could see an increase in development costs, and a potential decrease in website performance and usability if not built properly.
Because of the major changes in the Magento ecosystem, as of late 2019, we have made BigCommerce our preferred e-commerce platform. BigCommerce offers a wide range of enterprise e-commerce features, has well-documented and straightforward development, and best of all, it’s easy for clients to use which makes it an excellent Magento end of life option. If you’d like to schedule a free demo of the BigCommerce platform, contact us today.
Picking The Right Advertising Medium For Your Business or Brand Website
Often times website owners focus a large percentage of their efforts on working with their web design team to create a great looking and functional website, but tend to neglect to plan for how to properly market said website. When it comes to Internet marketing and online advertising, there is no ‘one size fits all’ way to go about it (unless of course budget is of no concern) so it’s always best to spend some time thinking about your audience, your goals, and taking a very careful audit of the tools available to reach that audience and your goals.
Local Website Advertising
If your business is primarily focused on attracting local customers to an attraction or service, it’s very important that you identify a couple of Internet marketing strategies and tools that will give the best return on your investment of time and money. First and foremost, being well ranked on Google Places and Google Maps can really make all of the difference for a business. In order to rank well, you not only need to have very well optimized Local Listing profiles, but you should also be represented on as many valued local listing websites as possible. Some examples of local listing websites are Google+, Yelp, FourSquare, CityPages and localdatabase.com. Further, all of your listings should be identical, having two listings with two different addresses will hurt more than it will help. Often times, creating and optimizing all of these directory listings can be a tedious task, so by working with a company like Yext you can pay a modest monthly fee and they handle all of the creation, optimization and modifications for you. What’s even more valuable is that in the situation where you need to modify your business address, phone number, or any other information, a tool like Yext will let you modify one time and they will then push the changes to all of the directories almost instantly.
Once your website and it’s online presence is well optimized, it may be worth looking into a form of paid advertising. Depending on the audience you are trying to reach, there are a number of different advertising channels available on a CPM (cost per thousand impressions) or CPC (cost per click) basis. Often times, local business owners are more budget conscious, which makes advertising through channels like Google Adwords much more difficult due to the higher cost for inventory. In this case, it’s best to try and identify places other than Google where your audience may be and buying ads there. For instance, if you own a Real Estate business, advertising through Zillow could be a far more affordable channel with a strong ROI. Other channels that are typically lower cost but still effective are Yelp, Facebook, LinkedIn, and local news channel websites.
Advertising For Products & Brands
If you have a brand or product that you’re trying to promote online, foot traffic in to a physical location is probably not nearly as big of a concern for you, whereas the overall awareness and positioning for your product within your audience are. Considering these goals, there are several channels in which you could advertise, but at this level it’s always best to diversify your advertising budget across 2 or more channels just to make sure you’re hitting your audience in as many places and as often as possible.
To start, using display advertising to showcase your product within ads on popular websites, would definitely be an advised approach for just about anyone in this space. In order to get your product recognized and to get people to look at it, it often takes more than just a bit of text to convince them. By creating visually appealing ads with attractive calls to action on advertising channels that are in-line with the type of content your audience would likely be interested in, you can reach thousands of people a day for just a couple of dollars per thousand.
Depending on the type of brand or product you’re promoting though, there are any number of options you can use for your secondary method of promotion. One advertising strategy that’s becoming increasingly popular is known as Influencer Marketing. This is the act of identifying 3-5+ ‘influencers’, or people with large, engaged following on various social media channels, and asking them to review or promote your product. Typically, the influencer will request free product in addition to payment, so this is definitely not a free form of advertising, but the potential for awareness, virality and ultimately return on your investment are large, as if you work with the correct influencers you can easily hit hundred’s of thousands if not millions of engaged followers in a day or two.
Advertising For National & International Businesses
Once your business is competing at the national or international level, your online advertising really takes on completely new goals and strategies. At this level, the competition pool is typically much smaller, and you’re typically competing for market share and awareness. In this situation, it’s definitely beneficial to have a large, extensive PPC campaign running through Google Adwords to ensure you’re putting your business name and offering in front of as many people looking for your services as possible. Google Adwords PPC can get to be very expensive, but at a certain point, the more clicks you drive, the more conversions you ultimately make, which can make your ROI skyrocket.
Further, customer relationship management should be a major strategy that is focused on as once you attain the customer you will want to make sure they’re not able to be stolen away by the competition. Creating social campaigns via Facebook, Youtube, and Instagram is a great way to quickly disseminate creative content to a large amount of people, but will also give you the chance at that “viral opportunity” everyone is looking for. These social channels also provide a platform in which your customers can communicate directly with you to ask questions, give feedback, or share information. Giving customers the option to directly communicate with a corporation is something that inspires confidence and will help to retain your current customers while inspiring potential customers to work with your business.
Retargeting
Retargeting, or remarketing, is a strategy that every business, no matter the size or location, should utilize. Retargeting is a very simple advertising strategy that works like this. First, you place a tracking pixel on your website that logs when the visitor enters, and another that tracks when they exit. If they exit your website without completing a desired action, for instance, a purchase, they will then be included in the ‘remarketing pool’. Now, when these users visit any number of websites or social channels within your retargeting network, they will be delivered display ads from your business, reinforcing your brand and brand message, encouraging them to return to your website and complete a purchase. This method of advertising does not secure any new website visitors for you, but is very effective at recapturing any conversions or customers that otherwise may have continued shopping elsewhere.
Bricks & Mortar Creative Signs With New Digital Partner
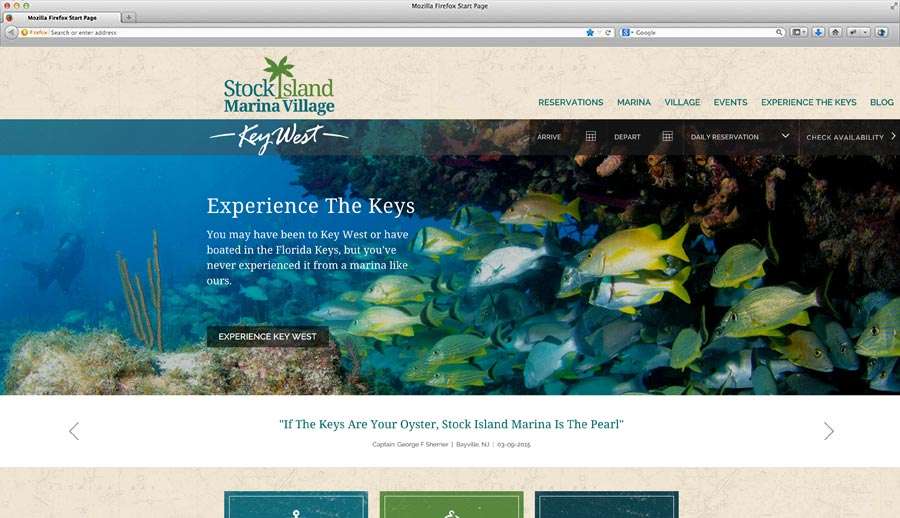
Bricks & Mortar Creative has just signed with a new digital partner, Stock Island Marina Village. Stock Island Marina Village is a newly developed marina, just beyond the noise and crowds of world famous Key West, Florida. A pioneer on the developing forefront of the rustic Stock Island, Stock Island Marina Village is redefining the boater experience with an unparalleled level of hospitality and service. As Destination Experts and Experience Providers with guests as the highest priority, Stock Island Marina Village is the best marina in South Florida.
As digital partners, Bricks & Mortar has been tasked with responsibilities including all website maintenance, content publication and updates, creation of new website code, creation of website templates, creation of custom WordPress post types, creation of graphics and branding materials, general online strategy and direction and much more. Our goal for Stock Island Marina Village, along with all of our digital partners, is to ensure they will need to spend as little time as possible managing their web presence, so that they can focus their time and energies on actually running their business.
We work as digital partners with clients of all types, representing various industries, and all with very specific needs and requirements. If you’d like to speak with us about how Bricks & Mortar Creative could potentially work as a digital partner for your company or organization, feel free to email us at info@bricksandmortarweb.com.
A Great Ping List For Your WordPress Posting Settings
Today’s post is a quick one for WordPress website owners who are looking for a little boost on their on page optimization and blogging activities.
If you own a WordPress website, you may be unaware of a very useful section within the Writing settings called “Update Services”. This box allows you to enter in “site update services”, or websites that are pinged whenever you post a new page, product or post. The idea is that once these sites are pinged, your site is crawled, resulting in faster page indexing on Google.
To add in the below list of Ping services, just hover over your “Settings” button and then click on “Writing”. Scroll all the way to the bottom of the page where it says “Update Services” and paste the list below in to the box. Once you’ve done this, you’re all good to go.
http://rpc.pingomatic.com/
http://blogsearch.google.com/ping/RPC2
http://api.my.yahoo.com/RPC2
http://api.my.yahoo.com/rss/ping
http://bblog.com/ping.php
http://blog.goo.ne.jp/XMLRPC
http://blogdb.jp/xmlrpc
http://blogmatcher.com/u.php
http://bulkfeeds.net/rpc
http://coreblog.org/ping/
http://mod-pubsub.org/kn_apps/blogchatt
http://www.lasermemory.com/lsrpc/
http://ping.amagle.com/
http://ping.bitacoras.com
http://ping.blo.gs/
http://ping.bloggers.jp/rpc/
http://ping.cocolog-nifty.com/xmlrpc
http://ping.blogmura.jp/rpc/
http://ping.feedburner.com
http://ping.myblog.jp
http://ping.rootblog.com/rpc.php
http://ping.weblogs.se/
http://pingoat.com/goat/RPC2
http://rcs.datashed.net/RPC2/
http://rpc.blogbuzzmachine.com/RPC2
http://rpc.icerocket.com:10080/
http://rpc.newsgator.com/
http://rpc.pingomatic.com
http://rpc.technorati.com/rpc/ping
http://rpc.weblogs.com/RPC2
http://topicexchange.com/RPC2
http://trackback.bakeinu.jp/bakeping.php
http://www.a2b.cc/setloc/bp.a2b
http://www.blogoole.com/ping/
http://www.blogoon.net/ping/
http://www.blogpeople.net/servlet/weblogUpdates
http://www.blogroots.com/tb_populi.blog?id=1
http://www.blogstreet.com/xrbin/xmlrpc.cgi
http://www.mod-pubsub.org/kn_apps/blogchatter/ping.php
http://www.popdex.com/addsite.php
http://www.snipsnap.org/RPC2
http://www.weblogues.com/RPC/
http://xmlrpc.blogg.de
http://xping.pubsub.com/ping/
Validating Phone Numbers With A Regular Expression
Often times when you’re looking to embed a form in your WordPress website or WooCommerce store, you’re going to be using one of 2 different plugins: Gravity Forms or Fast Secure Contact forms. FS Contact Forms is an excellent plugin, it is very customizable, and allows for you to utilize a lot of really great features, but does rely on you to provide any Regex you may need to validate your forms.
For many WordPress website owners, this just doesn’t quite cut it considering they’ve likely never used regex before and most of the copy/paste solutions won’t be formatted for exactly what you may need. In most cases, this is really only an issue though when it comes to phone number validation, so we are going to focus on validating a phone number with regex in this post.
First thing you’ll want to do is open up the form you’re looking to modify, find the Phone field, and then click Show Details to view the full options for the field in question. Once you’re looking at all of the available fields, you will see a field titled “Validation Regex”. Put your cursor in that field and then paste in the following regular expression:
[code] /(?([0-9]{3}))?([s .-]?)([0-9]{3})?([s .-]?)([0-9]{4})/[/code]
Now, move your cursor in to the input that says “Regex Failed Message” and paste in: Please Enter A Valid Phone Number, or simply create a failure message of your own.
This regular expression will allow for the following number formats to be accepted
– 1234567890
– 123-456-7890
– 123 456-8900
– (123)4567890
– (123) 456 7890
– (123) 456-7890
– (123)456-7890
So how does this regular expression work? Let’s break it down in to it’s pieces:
– The first part ^ means the “start of the line” which will force it to account for the whole string.
– The next block (?([0-9]{3})) is saying that any 3 numbers between 0 and 9 may be used here.
– The next block ?([s .-]?) is saying that after the 3 numbers there can be either a whitespace, no whitespace, a dash, or a period.
– The next block (?([0-9]{3})) is to validate another grouping of 3 numbers between 0 and 9
– The next block ?([s .-]?) is another block that validates either a whitespace, no whitespace, a dash, or a period after the middle 3 numbers
– The final block ([0-9]{4})/ validates a grouping of four numbers between 0 and 9 and then the expression is closed with the slash.
All in all, you should be able to copy and paste the regular expression above in to your FS Contact Form fields and have no issues, but if you’d like to make any modifications or updates, the breakdown above should assist with that as well.
Building A Well Rounded Website & Internet Presence For Your Small Business
When building a website for your small business, there are a few crucial items you should always take in to consideration; the design, the content, the optimization, and your website’s presence throughout the internet. As a website owner, these four things should be your primary concern, as removing any one of them from the equation will considerably reduce your ability to compete online.
The Design
It goes without saying that your website’s look and feel is extremely important. It is your businesses face on the internet, and you know what they say about first impressions. But when it comes to creating web layouts, the difference between a stunning design and a total disaster can be very minute differences. For instance, if your website is not built to be responsive, it may look great within your browser, however it may look completely different to other users who happen to be using smaller screens. So, if your plan is to grow your small business through online marketing and awareness, it’s highly advised that you hire a professional web design agency to design and build your website for you.
There are several things you should be looking for in the design including fully responsive behavior, a working mobile and tablet version of the website, use of modern UI elements like dynamic tabs and parallax sections, visible and easily accessible inclusion of social media links and social media icons, fast page load times and page speed scores, and inclusion of a content management system to control each aspect of your website just to name a few.
Once you’ve found a strong web design agency to work with and have your brand new, fully responsive website launched, now it’s time to start thinking about how you can grow your online presence. The first step in this process is typically on page optimization, or the act of engineering your website and it’s content for best results in search engine rankings. Most aspects of your website’s on page optimization will need to be implemented by your developer, but you can and should be involved in the strategy.
On Page Optimization
As we mentioned above, as a small business website owner you should ensure that your website is fully optimized online for best search engine performance, and you should be involved in the strategy for the optimization.
To start, your developer will need to code the website so that it follows very specific standards and practices, for instance, no page should have more than one usage of an h1 header tag. However, the true optimization comes from making sure that the content (or text) entered within the h1 header tag is the best possible content to target your potential customers.
For example, if you have a store in Fort Lauderdale, FL that sells surfboards, you would want to have something along the lines of “Fort Lauderdale Surfboard Shop” or “Fort Lauderdale Surfboards” in your h1 header tag. What you would not want to do would be to include useless text like “Contact Us Today!” or worse, embed an image in the tag which would really hurt your on page optimization.
Ideally, your web developer will have some background in SEO and on page optimization, so that the strategy is a joint effort, where he contributes the technical SEO know-how and you contribute the deeper understanding of your customers and your product, so that optimization can be implemented as close to perfect as possible.
Once your website is fully optimized on page, you are now in “fighting shape” and can begin to think about really expanding your online presence through the creation of unique content.
The Content
In the world of online marketing there is a saying that everyone has heard which could not be more true, “Content is king”. So what exactly does this mean and what is “content”?
To start, website content are simply the words that appear on any given web page whether it be 10 words or 1000 words. The page’s content is how Google is able to understand what the page is about, how it relates to the content of other websites and web pages, and ultimately how it will rank your website.
Now, when we talk about content being “king” however, we are not referring so much to the content that appears on your home page or your about page, but more about the content that you are creating in the form of high quality, highly focused blog posts and articles.
For example, if our Fort Lauderdale Surfboard website has 5 top level pages, it will look like a decent source of information on surfboards in Fort Lauderdale to Google. However, it’s likely that all of the other Fort Lauderdale Surfboard websites will have 5 very similar pages, with very similar content. But, by creating articles or blog posts with unique, high quality content focusing on surfboards, surf shops, or surfing in general, we are now adding additional pages that Google can crawl to learn more about our website.
So if our website has 20 articles on surfboards, for instance how to pick the right surfboard for your height, finding a local surfboard shaper, or when the best time of year to use your surfboard is, you now have 20 more pages than your competition which will make you look better to Google, 20 more pages of information you can make available to your users, and most importantly 20 more opportunities for your website to be found in Google’s search results.
Now that you are steadily and consistently creating high quality content on your website, it’s time to start thinking about what you can do to grow your online presence outside of your website.
Website Presence
The best method to quickly improve your website’s presence with spending little to no money on advertising is by having other websites talk about your website as well. When we say “talk” about your website, this is usually done through building citations to your website as well as building backlinks to your site through articles other people are publishing.
1. Building Citations
Building citations is one of the most effective and powerful tactics you can implement to help improve your local SEO results, and you don’t need to be any sort of expert to do it. To start, let’s talk about what a citation is.
A citation is the mention of your business, it’s website, physical address, phone number, and often some other information like hours of operation and images on a third party website. Some examples of these websites would be Yelp, Foursquare, Google Places, and Best of the Web.
It’s not only important that you have as many high quality citations created as possible, but it’s equally important that your business information is perfectly identical across each of your citations. For instance, if one website was reporting your phone number as (123)456-7890 and another reported it as (231)456-8890, it would indicate to Google that the business may no longer be updating it’s online presence, may be out of business, or a number of other situations that would hurt your rankings.
Using a service like Yext or LocalVox will not only help with perfect citation creation quickly, but will also ensure that whenever you do update your business information, that each one of your citations is also updated simultaneously, removing the need for a lot of work on your end.
2. Building Quality Backlinks
Once you have a nice portfolio of local citations created, now your focus should be on acquiring some higher quality backlinks from within unique articles published on third party websites.
When researching websites that you are going to approach for potential backlinking, it’s important to understand what the value of that link may be. One strong indicator on to how valuable a link may be is the website’s “domain authority”. Without diving too deep in to the specifics, domain authority is simply a metric that rates websites from 0 to 100, the closer to 100 you are, the more “authority” your website has on a topic in the eyes of Google. It’s always best to receive backlinks from websites with as high a domain authority as possible, but you should always try to make sure that the website is at least a DA10.
Once you’ve identified a nice list of websites that you’re going to approach about backlinking, it’s important that you really nail down your pitch. You should be prepared with an article topic, some key points of information, customer reviews to reinforce your statements, and even a free sample of your product if you’re promoting one. By providing the blogger or website owner with as much information as you can on your products or services, potential story ideas, or even physical product for them to try for themselves, you will significantly increase your chances of getting a positive response from the site owners.
Turning your small business in to a medium or large size business through online marketing can be done! But just as any skyscraper is built on top of a strong foundation, your websites presence and growth is entirely dependent upon a strong foundation of design aesthetics, content and optimization.
What Is Responsive Web Design?
Over the past several years, web design principals and methods have been shifting very rapidly. One of the bigger revelations in web design and layout however has been the advent of responsive web design. You may be asking yourself, “So what is responsive web design?”, and if so you’re in good company. This is a question I am asked at least once a day by both current and prospective clients.
In short, responsive web design is the process of designing a website so that it will maintain the same aesthetics, elements, proportions and features, no matter the screen size or device that the user may be accessing your website through. For example, let’s assume you have an area on your website that is meant to have a contact form and a map that will sit next to each other. A website that has been designed for responsive behavior would ensure that both the contact form and map will stay on the same row, as well as shrink or grow themselves proportionally as the screen grows or shrinks. So how is this achieved?
Using Percentages Instead of Fixed Widths
Before responsive web design was the standard, developers would used what are called fixed widths to define a certain elements size. For example, we may have given our contact form a fixed width of 350 pixels. Developers were able to get away with this previously by making sure their entire website content was within a container no larger than 800 pixels to 840 pixels, as this would ensure proper viewing on even the smallest screens. This code may look something like the code below:
<html lang="en">
<head>
<meta charset="UTF-8">
<title>Document</title>
<style>
.container{
width:800px;
}
.contact-form{
width:350px;
}
.map{
width:450px;
}
</style>
</head>
<body>
<div class="container">
<div class="contact-form">
<form action="">
This Is Our Contact Form
</form>
</div>
<div class="map">
This Is Our Map
</div>
</div>
</body>
</html>
[/html]
However, as displays began to become larger and retina displays were introduced, it no longer became feasible to restrict your entire website’s content to a mere 800 pixels wide.
So, in order to combat this issue, instead of fixed widths, we now use percentages to define our widths where every element is equal to a percentage of it’s container. So, for instance, instead of defining our website container as 800 pixels wide, we may want to set the width to “90%” so that it fills up 90% of the browser window. We can then also set our elements within the container to use dynamic widths instead of fixed widths:
[html] <!DOCTYPE html><html lang="en">
<head>
<meta charset="UTF-8">
<title>Document</title>
<style>
.container{
width:90%;
}
.contact-form{
width:40%;
}
.map{
width:60%;
}
</style>
</head>
<body>
<div class="container">
<div class="contact-form">
<form action="">
This Is Our Contact Form
</form>
</div>
<div class="map">
This Is Our Map
</div>
</div>
</body>
</html>
[/html]
Keep in mind, we are able to give our container a width of 90% because it is an element that is only contained by the “body tag” and the browser already knows that the body should be equal to “100% of the window”. So by telling your container you’d like it to have a width of 90%, you’re actually saying that it should be equal to 90% of the actual full browser window. Now, since your container and it’s elements are all using dynamic widths, whenever the website is viewed on a smaller or larger screen, everything will scale as needed to remain in the same proportions.
Working With Dynamic or Fluid Heights
Unfortunately, the height attribute is not as easy to work with as the width attribute as you wouldn’t typically assign a fixed height to your website’s body. This of course makes it difficult to make certain elements like squares responsive. In order to combat this, most modern browsers make both the ‘viewport height (vh)’ and ‘viewport width (vw)’ values available. These work very similarly to percentages, but they only use window size as the baseline, instead of being based on an elements container (which may not always be 100% of the window).
Using our example from above, we could set our container width to 90vw, or 90 percent of the full view width, which would be the same as 90% of the body. However, if we were to then set our contact form to 40vw, it would be equivalent to 40% of the view width, not 40% of the container, so it would likely be much larger than intended. Rule of thumb here is to use the VW value for your containers, but to then use percentages for all of the elements within the container.
At the same time, the VW and VH values can be used for height in any situation whereas percentages won’t always be usable. For example, let’s assume we’d like to make a square shape responsive and have assigned it a width of 20vw so we can make sure that it will shrink down width wise dependent upon the size of the screen. Now to ensure the height will also respond as needed, we can set that to 20vw as well so now both the height and width of the element will be the equivalent of 20 percent of the full view width.
When it comes to the height of elements however, every situation will be different, so just make sure to test out a couple of options in varying browser sizes before settling on one.
CSS Media Queries
In addition to using dynamic heights and widths in CSS to improve responsive behavior, designers and developers also use what are called “media queries” to define “break points” in their code. These points identify the point at which your current layout “breaks” from a look and feel standpoint. For instance, let’s say your blog page lays out blog articles in rows of 4 where each article takes up 25% of the row. At a certain point, even though the four posts may still technically fit on the line, a width of 25% may only be the equivalent of 50px, which would mean all of the contents would be squished beyond recognition. So in this case, the point where the articles start to become too small for a positive user experience would be considered a “break point”, and for the purposes of this example, we’ll say that occurred at a screen width of 1200 pixels.
The first thing you will want to do to address this issue will be to first introduce a new media query into your stylesheet which would look like this:
[css] .article{width:25%;
}
@media screen and (max-width:1200px){
//This is where your code updates will go. For example:
.article{
width:33%;
}
}
[/css]
So what is happening here? In short, our “media query” is telling our stylesheet that even though normally the class article will have a width of 25%, whenever the window is smaller than 1200 pixels (or whenever the window is a maximum width of 1200 pixels) that it should then change the rule for the article class to be 33% wide. Media queries are unbelievably useful in creating these types of layouts that can adapt and modify themselves for peak performance and user experience on any screen size. Media queries are also useful for creating mobile and tablet optimized websites.
So What Is Responsive Design?
In summary, designing a website to be responsive means that it will be able to identify the size of whatever device you are using to access it, and that it will resize and reconfigure any or all of it’s elements so that there is no compromise in user experience. If you would like any help in understanding responsive web design further, or assistance in updating your current website so that it is responsive, please feel free to reach out and one of our team members would be glad to help you reach your goals.